


Online meetings, webinars, and virtual consultations have become essential for businesses. If you’re using WordPress, integrating Zoom can help you automate meetings, bookings, and communication directly from your website.
Whether you run a service business, coaching platform, or marketplace, Zoom integration allows you to connect with users seamlessly without manual work.
In this guide, you’ll learn how to integrate Zoom with WordPress step-by-step.
🔴 Why Integrate Zoom with WordPress?
Integrating Zoom into your website provides many benefits:
✔ Automated meeting creation
✔ Easy scheduling
✔ Better user experience
✔ Reduced manual work
✔ Professional service delivery
👉 It turns your website into a complete online communication platform.
🧠 Common Use Cases
Zoom + WordPress integration is useful for:
✔ Online consultations
✔ Coaching sessions
✔ Webinars & events
✔ Customer support calls
✔ Training programs
👉 Ideal for both individual businesses and marketplaces.
⚙️ Integration Methods
There are three main ways to integrate Zoom with WordPress:
1️⃣ Using Plugins (Easy Method)
The easiest way is to use a plugin.
Popular plugins:
-
Video Conferencing with Zoom
-
FluentCRM (for automation + webinars)
Features:
✔ Connect Zoom account
✔ Create meetings from dashboard
✔ Shortcodes for display
✔ User-friendly setup
👉 Best for beginners.
2️⃣ Using WooCommerce + Booking (Advanced)
For service-based websites, combine:
-
WooCommerce
-
WooCommerce Bookings plugin
-
Zoom integration plugin
Workflow:
✔ User books appointment
✔ Payment is processed
✔ Zoom meeting auto-created
✔ Link sent via email
👉 Perfect for paid consultations.
3️⃣ Using Zoom API (Custom Development)
For full control, use Zoom API.
Steps:
✔ Create Zoom developer account
✔ Generate API credentials (OAuth)
✔ Connect with WordPress via custom plugin
Capabilities:
✔ Auto-create meetings
✔ Generate dynamic links
✔ Sync users and schedules
✔ Build custom workflows
👉 Best for custom platforms and marketplaces.
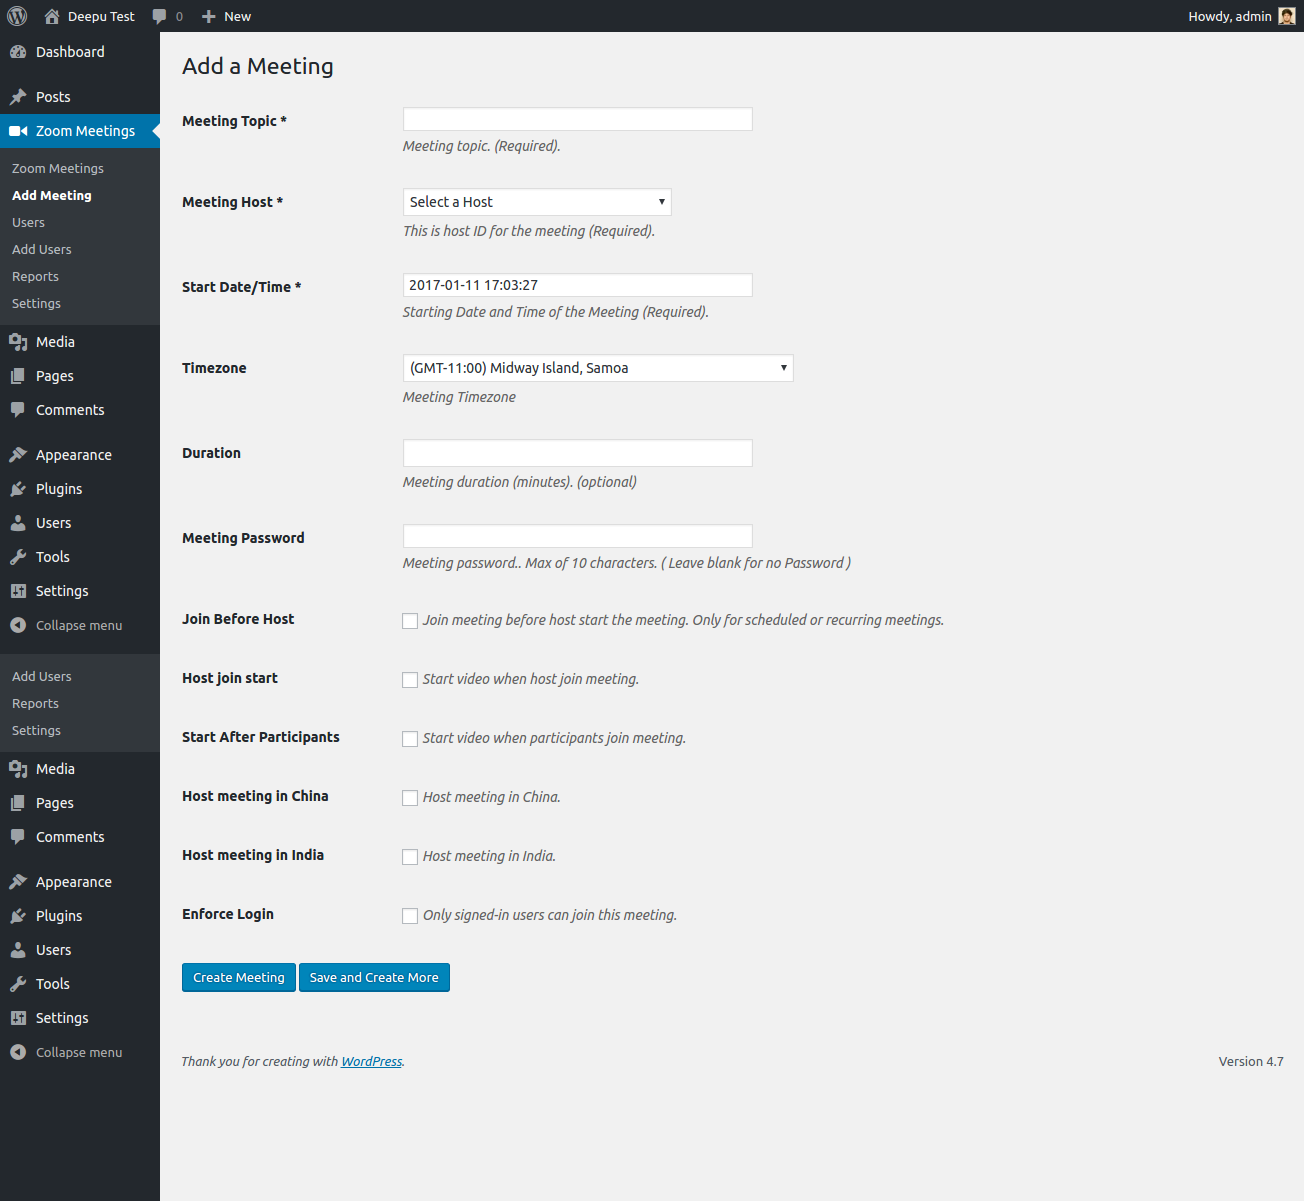
📅 Step-by-Step Basic Setup (Plugin Method)
Step 1: Install Zoom Plugin
Install a Zoom integration plugin from WordPress repository.
Step 2: Connect Zoom Account
Enter API keys or OAuth credentials.
Step 3: Create Meeting
Create meetings directly from WordPress dashboard.
Step 4: Display Meeting
Use shortcode or page builder to show meeting details.
👉 Your Zoom integration is ready.
📩 Automating Notifications
Automation improves user experience.
Set up:
✔ Meeting confirmation emails
✔ Reminder emails
✔ Calendar invites
👉 Reduces missed meetings.
🔐 Security Best Practices
When integrating Zoom:
✔ Use secure API authentication
✔ Restrict meeting access
✔ Enable passwords for meetings
✔ Avoid exposing links publicly
👉 Keeps your meetings safe.
🚀 Performance Optimization
To keep your website fast:
✔ Use caching
✔ Optimize API calls
✔ Avoid unnecessary plugins
✔ Use background processing for tasks
👉 Ensures smooth performance.
📈 Advanced Features You Can Build
With custom integration, you can create:
✔ Membership-based meeting access
✔ Multi-vendor booking systems
✔ Automated webinar funnels
✔ Subscription-based consultations
👉 Endless possibilities with WordPress.
🚨 Common Mistakes to Avoid
❌ Manual meeting creation
❌ No automation
❌ Poor security setup
❌ No reminders
❌ Overloading plugins
👉 These reduce efficiency and reliability.
📌 Integration Checklist
✔ Choose integration method
✔ Connect Zoom account
✔ Set up meetings
✔ Enable notifications
✔ Secure access
✔ Optimize performance
👉 Follow this for a successful setup.

Hire Me on Upwork – Dokan & WooCommerce Expert
