


In a multi-vendor marketplace, vendor quality = marketplace success.
If anyone can register and start selling without proper checks, it can lead to:
❌ Low-quality products
❌ Fraud vendors
❌ Customer complaints
❌ Poor marketplace reputation
That’s why building a custom vendor approval logic is essential when using Dokan with WordPress and WooCommerce.
In this guide, you’ll learn how to create advanced vendor approval workflows in Dokan.
🔴 What is Vendor Approval Logic?
Vendor approval logic defines how and when a vendor is allowed to start selling on your marketplace.
Instead of simple manual approval, you can build:
✔ Automated checks
✔ Conditional approvals
✔ Multi-step verification
✔ Role-based approvals
👉 This ensures only quality vendors join your platform.
🧠 Why Custom Vendor Approval is Important
Without proper approval:
❌ Spam vendor registrations
❌ Fake products
❌ Increased disputes
❌ Trust issues
With custom logic:
✔ Controlled onboarding
✔ Verified vendors
✔ Better marketplace quality
✔ Reduced fraud
👉 Approval system = quality control layer
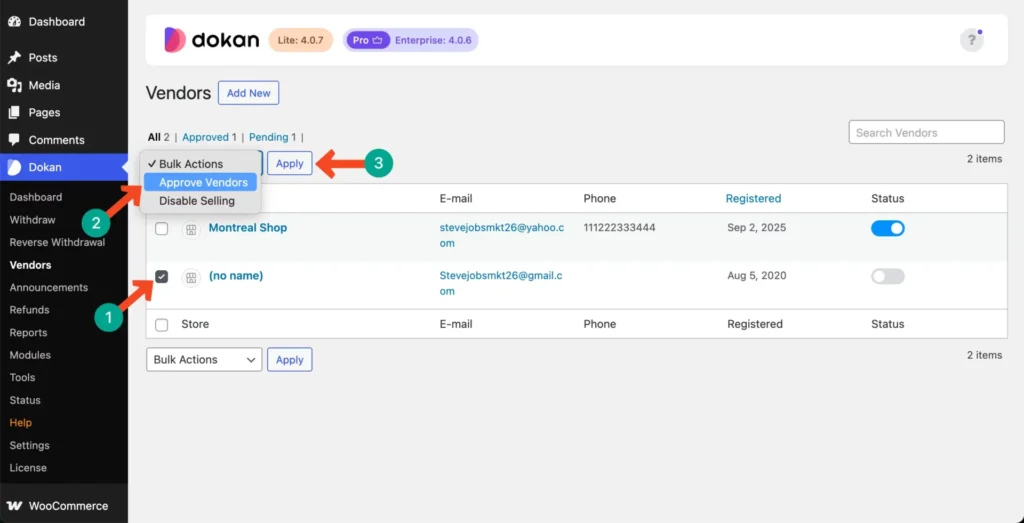
⚙️ Default Dokan Vendor Approval
By default, Dokan provides:
✔ Manual admin approval
✔ Auto approval option
✔ Basic vendor registration
👉 But this is not enough for serious marketplaces.
🏗️ Types of Custom Approval Logic
1️⃣ Manual Approval with Conditions
Admin approves vendors based on:
✔ Business type
✔ Documents submitted
✔ Product category
👉 Basic but effective.
2️⃣ Document-Based Verification
Require vendors to upload:
✔ ID proof
✔ GST certificate
✔ Business license
Workflow:
✔ Vendor submits documents
✔ Admin verifies
✔ Approval granted
👉 Essential for B2B marketplaces.
3️⃣ Automatic Approval Rules
Automate approval based on conditions:
✔ Email domain (business email only)
✔ Country restrictions
✔ Required fields validation
👉 Reduces manual work.
4️⃣ Multi-Step Approval Process
Advanced workflow:
- Registration
- Document verification
- Admin approval
- Store activation
👉 Ensures full verification.
5️⃣ Category-Based Approval
Approve vendors based on category:
✔ Electronics → strict approval
✔ Handmade → easy approval
👉 Different rules for different niches.
🧑💻 How to Implement Custom Logic (Developer Approach)
You can extend Dokan using hooks and filters.
Example logic:
- Block vendor approval until documents are uploaded
- Assign custom status (pending verification)
- Trigger approval after admin review
Key areas:
✔ User registration hooks
✔ User meta validation
✔ Custom admin actions
👉 Requires custom development.
🔌 Using Plugins for Approval Workflow
You can use:
✔ Custom registration plugins
✔ User role management plugins
✔ Form builders
👉 For non-developers.
📊 Vendor Status Management
Create custom statuses:
✔ Pending
✔ Under Review
✔ Approved
✔ Rejected
✔ Suspended
👉 Helps track vendor lifecycle.
🔔 Automate Notifications
Keep vendors informed:
✔ Registration confirmation
✔ Approval/rejection email
✔ Missing documents alert
👉 Improves experience.
🔐 Security & Compliance
Ensure:
✔ Data validation
✔ Secure document storage
✔ GDPR compliance
✔ Restricted access
👉 Protects your platform.
📈 Real Example Workflow
A professional approval system:
✔ Vendor registers
✔ Uploads documents
✔ System checks fields
✔ Admin reviews
✔ Vendor approved
👉 Reduces fraud and improves quality.
🚨 Common Mistakes to Avoid
❌ Instant auto approval
❌ No verification
❌ Poor document handling
❌ No status tracking
❌ No notifications
👉 These reduce trust.
📌 Vendor Approval Checklist
✔ Define approval rules
✔ Add document upload
✔ Create custom statuses
✔ Automate notifications
✔ Secure data
👉 Follow this for best results.
📚 Internal Links
4
In a multi-vendor marketplace, vendor quality = marketplace success.
If anyone can register and start selling without proper checks, it can lead to:
❌ Low-quality products
❌ Fraud vendors
❌ Customer complaints
❌ Poor marketplace reputation
That’s why building a custom vendor approval logic is essential when using Dokan with WordPress and WooCommerce.
In this guide, you’ll learn how to create advanced vendor approval workflows in Dokan.
🔴 What is Vendor Approval Logic?
Vendor approval logic defines how and when a vendor is allowed to start selling on your marketplace.
Instead of simple manual approval, you can build:
✔ Automated checks
✔ Conditional approvals
✔ Multi-step verification
✔ Role-based approvals
👉 This ensures only quality vendors join your platform.
🧠 Why Custom Vendor Approval is Important
Without proper approval:
❌ Spam vendor registrations
❌ Fake products
❌ Increased disputes
❌ Trust issues
With custom logic:
✔ Controlled onboarding
✔ Verified vendors
✔ Better marketplace quality
✔ Reduced fraud
👉 Approval system = quality control layer
⚙️ Default Dokan Vendor Approval
By default, Dokan provides:
✔ Manual admin approval
✔ Auto approval option
✔ Basic vendor registration
👉 But this is not enough for serious marketplaces.
🏗️ Types of Custom Approval Logic
1️⃣ Manual Approval with Conditions
Admin approves vendors based on:
✔ Business type
✔ Documents submitted
✔ Product category
👉 Basic but effective.
2️⃣ Document-Based Verification
Require vendors to upload:
✔ ID proof
✔ GST certificate
✔ Business license
Workflow:
✔ Vendor submits documents
✔ Admin verifies
✔ Approval granted
👉 Essential for B2B marketplaces.
3️⃣ Automatic Approval Rules
Automate approval based on conditions:
✔ Email domain (business email only)
✔ Country restrictions
✔ Required fields validation
👉 Reduces manual work.
4️⃣ Multi-Step Approval Process
Advanced workflow:
Registration
Document verification
Admin approval
Store activation
👉 Ensures full verification.
5️⃣ Category-Based Approval
Approve vendors based on category:
✔ Electronics → strict approval
✔ Handmade → easy approval
👉 Different rules for different niches.
🧑💻 How to Implement Custom Logic (Developer Approach)
You can extend Dokan using hooks and filters.
Example logic:
Block vendor approval until documents are uploaded
Assign custom status (pending verification)
Trigger approval after admin review
Key areas:
✔ User registration hooks
✔ User meta validation
✔ Custom admin actions
👉 Requires custom development.
🔌 Using Plugins for Approval Workflow
You can use:
✔ Custom registration plugins
✔ User role management plugins
✔ Form builders
👉 For non-developers.
📊 Vendor Status Management
Create custom statuses:
✔ Pending
✔ Under Review
✔ Approved
✔ Rejected
✔ Suspended
👉 Helps track vendor lifecycle.
🔔 Automate Notifications
Keep vendors informed:
✔ Registration confirmation
✔ Approval/rejection email
✔ Missing documents alert
👉 Improves experience.
🔐 Security & Compliance
Ensure:
✔ Data validation
✔ Secure document storage
✔ GDPR compliance
✔ Restricted access
👉 Protects your platform.
📈 Real Example Workflow
A professional approval system:
✔ Vendor registers
✔ Uploads documents
✔ System checks fields
✔ Admin reviews
✔ Vendor approved
👉 Reduces fraud and improves quality.
🚨 Common Mistakes to Avoid
❌ Instant auto approval
❌ No verification
❌ Poor document handling
❌ No status tracking
❌ No notifications
👉 These reduce trust.
📌 Vendor Approval Checklist
✔ Define approval rules
✔ Add document upload
✔ Create custom statuses
✔ Automate notifications
✔ Secure data
👉 Follow this for best results.
📚 Internal Links

Hire Me on Upwork – Dokan & WooCommerce Expert
